Step by Step to Lino Printing with the Artway Printmaking Kit
31st Jan 2024

Artway Printmaking Kit - Lino/Relief
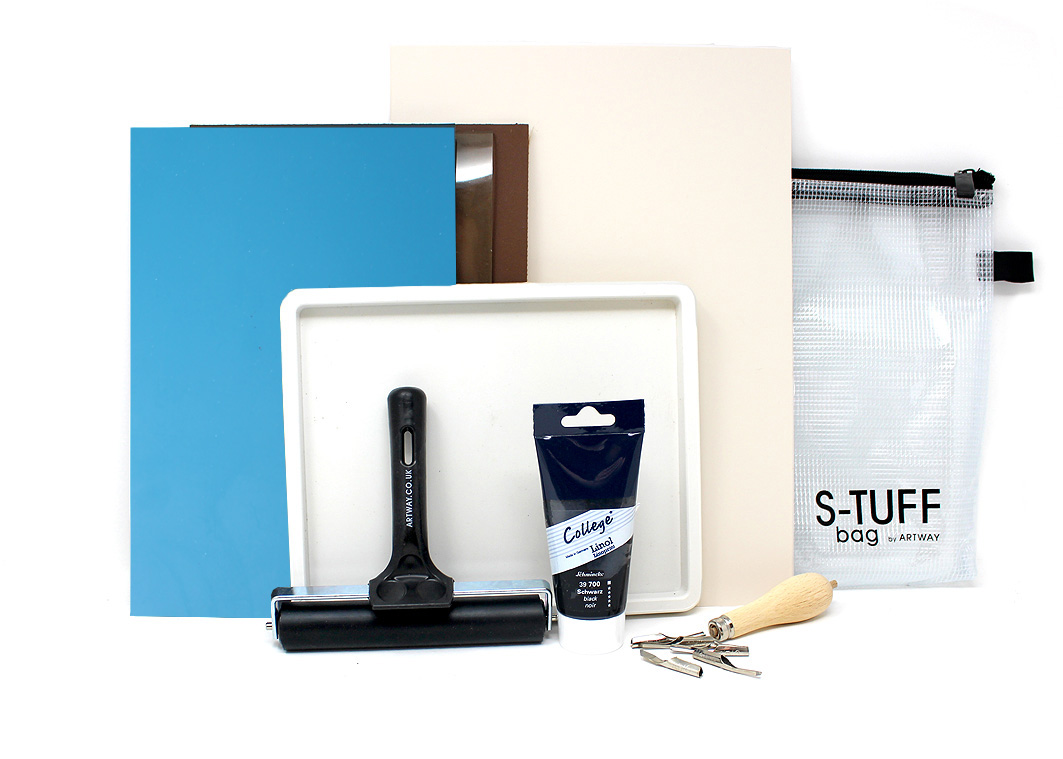
INCLUDED IN THE KIT :
3 printing sheets:
Traditional Lino - brown linoleum sheet with hessian backing. Provides a more refined and firmer surface to achieve finer detail. PLEASE NOTE traditional lino requires warming to soften its surface prior to and during use (a radiator will work)
Transparent Polymer Sheet - see-through plastic polymer. A medium firmness and smoother surface. Great for multilayered prints where alignment and registration of layers are important. Designs are easily applied by tracing through the surface
Blue Polymer Sheet - solid plastic polymer. Qualities similar to the transparent Sheet but a little softer surface. Solid in colour making carving designs easier to discern.
- Inking tray
- Artway Brayer Roller (15cm)
- ABIG Lino Cutter with 5 cutting nibs
- Schmincke Lino Ink (75ml)
- 2 Sheets of Fabriano Unica printmaking paper - White (35 x 25cm)
- 2 Sheets of Fabriano Unica printmaking paper - Cream (35 x 25cm)
STEP BY STEP :
- First, decide what you want to print - This can be anything but we would recommend starting with something simple and not too detailed
- Transferring your design - You can either draw straight on to your printing sheet or you can trace/transfer your design with tracing paper. A soft pencil (2B/4B) will work well on the traditional lino and blue polymer sheets whilst a marker pen (Sharpie) are better suited to the transparent surface
TIP - Colour / block in all the sections you want to leave and cut away the clear section (these will be the colour of the paper)
REMEMBER ANYTHING YOU DRAW ON TO THE LINO WILL BE A MIRROR IMAGE ONCE PRINTED
- Once you’ve produced your design you are ready to start carving! - Lino/wood cutters are very sharp so ALWAYS cut away from you - take it slow and steady to improve accuracy … there’s no rush!
TIP - On a scrap piece of printing sheet practice your cutting action and test out your mark making skills
Know where your fingers are - this might sound silly but you’ll want to naturally hold your printing sheet at the opposite edge to you, in the direction that you are cutting. AVOID THIS and try to hold the printing sheet behind your direction of cutting. A bench hook is highly recommended to improve stability and safety. The knife should glide easily through the material - DO NOT FORCE IT particularly with traditional lino which might need rewarming to make it soft again
- Once you’ve carved your design you are ready to print!
- Apply a small amount of ink to your inking tray - Don’t use too much ink as you’ll over ink your printing sheet and the print may smudge. Roll out an even coating of ink in your tray
- Ink-up your sheet - Make sure the brayer roller surface has a covering of ink from the inking tray. Transfer and roll over the printing surface with smooth strokes for even coverage
- PRINT! - Take you paper and gently place over the printing surface. Take your time when locating the paper as once it is down there is no room for repositioning - contact has already been made with the inked surface
- Rub/smooth print from the centre outward - Apply gentle pressure to the back of the paper. Start from the middle and rub/smooth outwards in circular motions.
TIP - Print barrens are traditionally used to apply pressure at this final stage with a sculpted handle for ease of use and a felt pad to protect the surface below - you might be able to adapt household objects (like a wooden spoon with a cloth over) to work in a similar way
- Peel paper off - Peel the paper off in one motion and leave to dry
- Your first print - Ta da! It can be tricky to get a perfect print first time so keep trying and experimenting. But also have fun!
Links to products

